
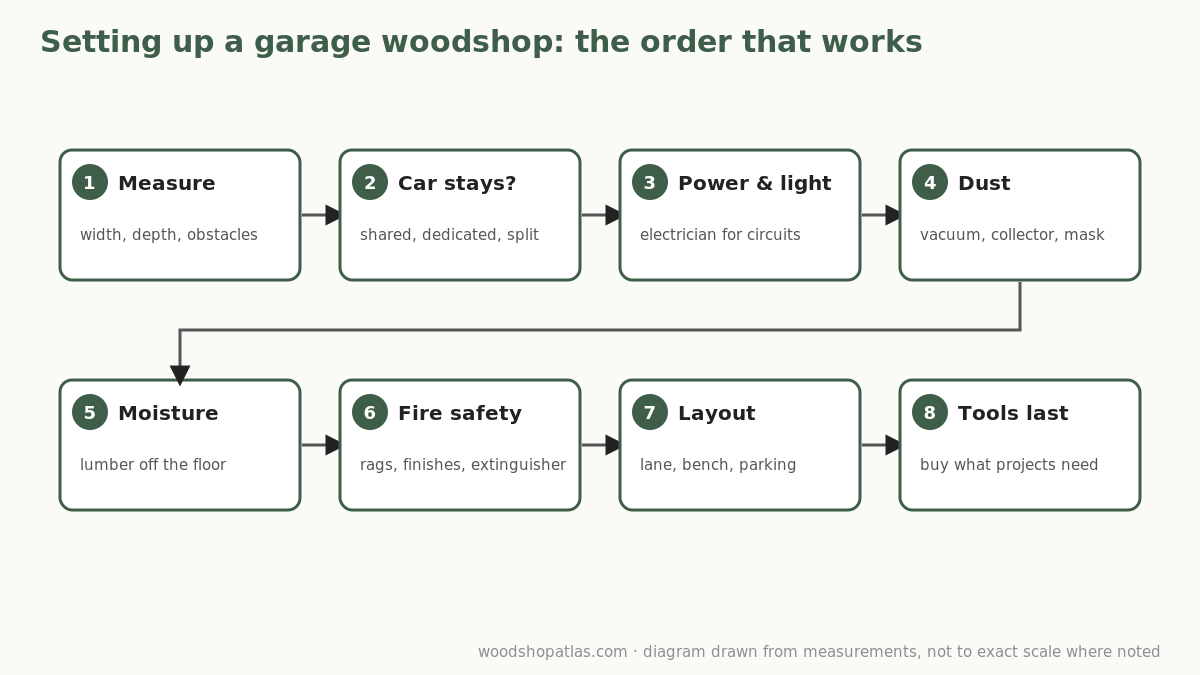
To set up a garage woodshop, work in this order: measure the space, decide whether a car will still park there, get the power and lighting sorted, plan for dust, deal with humidity and temperature, set up fire safety, lay out the bench and machines, and only then buy the bigger tools. Most frustration in garage shops comes from doing those steps backwards, buying a big machine first and then discovering there’s no room to use it, no circuit to run it, or no way to keep the dust out of the house.
Here’s each step and what to decide.
Step 1: Measure what you actually have
Nominal garage sizes (12 x 20 ft for one car, 20 x 20 ft or more for two) are a starting point. Measure:
- Clear width and depth at about 36 in (91 cm) high, where benches and tools will be
- Steps, the water heater, the electrical panel, posts and anything else on the walls
- Ceiling height, and the height under the garage door tracks and opener
- Doors and windows, including how they swing
- The car, if it stays: length, width mirror to mirror and the space to open the driver’s door
Our guide to measuring equipment and space has a worksheet for this.
Step 2: Decide whether the car stays
This is the biggest decision, because it sets everything else.
- Shared garage: a bench on a side wall sized to the gap beside the car, wall storage, and tools on wheels or folding stands that park against the walls. You work with the car out. See how to fit a woodshop in a garage and still park the car and the 10-minute workshop reset.
- Dedicated shop: the whole floor is yours. You can fix the bench, give the table saw a permanent lane and build lumber storage on a long wall. See one-car garage woodshop layouts.
- Half and half: in a two-car garage, one bay for the car and one for the shop, with machines that roll into the second bay when the car is out.
Step 3: Power and lighting
Power: a woodshop needs more outlets than most garages have, in more places. Woodworking tools draw real current: DeWalt’s DWE7491 table saw and DW735 planer are both 15 A tools, according to their manuals. Before you plan where tools will run, find out which outlets share a circuit. If you need new circuits, more outlets or a 240 V supply for a larger machine, have a licensed electrician assess and do the work. Avoid running big tools from long, light extension cords; tool manuals specify minimum cord sizes for a reason.
Lighting: a single bulb in the middle of a garage leaves shadows on every surface. Plan for bright, even overhead light across the work area plus task lighting over the bench. Good light matters for accuracy and for safety around blades.
Step 4: Dust
Dust is the problem that follows you into the house. OSHA lists dermatitis, asthma and other respiratory effects among the health effects of wood dust, and some hardwoods have been linked to nasal cancer at high exposures (OSHA). OSHA’s guidance for workplaces puts capturing dust at the source first (OSHA), and Oregon OSHA’s fact sheet advises sweeping or vacuuming rather than using compressed air to clean (Oregon OSHA).
For a garage shop that means:
- A shop vacuum connected to sanders, saws and routers as you use them
- A dust collector or a chip separator if you plane or use a table saw a lot (DeWalt doesn’t recommend a shop vacuum alone for the DW735 planer, because it can’t keep up with the chips)
- A dust mask or respirator for sanding and sawing, even with collection
- Cleaning by vacuum, not compressed air or a broom that throws fine dust back into the air
- A closed door to the house while you work
Step 5: Humidity, temperature and wood movement
Garages are rarely climate-controlled, and wood responds to the air around it. The USDA Forest Service’s Wood Handbook recommends an average moisture content of about 8% for interior woodwork and furniture in most of the United States, about 6% in the dry Southwest and about 11% in damp, warm coastal areas (USDA Wood Handbook, ch. 13). Lumber stored in a damp garage can sit well above those levels, and then shrink, cup or crack once the finished piece comes indoors.
Practical steps:
- Store lumber off the floor on racks, and away from exterior doors.
- Let wood acclimate in the conditions it’ll live in before final milling, when you can.
- A moisture meter is inexpensive and takes the guessing out of it.
- Check finish and glue labels for minimum application temperatures before working in a cold garage.
- Protect cast-iron tops from rust in humid garages with a paste wax or a cover.
Step 6: Fire safety
A woodshop adds fuel to a garage: dust, shavings, finishes and rags. DeWalt’s table saw manual warns that accumulated sawdust is combustible and may self-ignite, and tells you to clean it from under the saw table and the dust collection device frequently (DeWalt manual).
- Oily finishing rags need special handling; the NFPA’s guidance and our workshop reset routine cover what to do.
- Keep finishes in closed containers, away from heat sources and the water heater.
- Empty dust bins and vacuums before they’re full and at the end of a session.
- Keep a fire extinguisher where you can reach it from the door, and check that the garage has a working smoke or heat alarm.
Step 7: Lay out the shop
With the space, power and conditions known, place things in this order:
- The longest cutting lane, usually along the garage’s long axis, about 18 ft (5.5 m) to rip an 8-ft board on a jobsite table saw.
- The workbench on a side wall, away from the garage door. See our garage workbench guide.
- Lumber and sheet storage on the opposite wall or overhead, away from the door tracks.
- Machines on wheels, with taped parking spots.
- Dust collection near the saw and planer.
- Finishing near ventilation and away from dust.
The principles behind this are in our small woodworking shop layout guide. To try it on screen, use the garage workshop planner.
Step 8: Buy tools in the right order
Start with what your first projects need, not with the biggest machine. For most garage shops that means safety gear, measuring tools, a circular saw with a guide, a drill/driver, clamps and a sander. See beginner woodworking tools, then what to buy after a circular saw and drill, and portable vs. stationary tools when you’re ready for machines.
Garage woodshop vs. a basement or shed
A garage has real advantages for a woodshop: a big door for bringing in lumber and sheet goods, a concrete floor that handles heavy machines, and some distance from living space for noise and dust. The trade-offs are humidity and temperature swings, sharing space with a car, and often limited circuits. A basement is usually more stable in temperature but harder to get long boards into, and dust travels into the house more easily. A shed keeps everything separate but is usually small; see the 10 x 12 ft example in our small woodworking shop layout guide.
Garage woodshop setup checklist
| Step | Done when |
|---|---|
| Measure | You have clear width and depth at bench height, obstacles and ceiling heights written down |
| Car decision | You know whether the shop is shared, dedicated or split |
| Power and light | You know which outlets share circuits; any new circuits are done by an electrician; the work area is evenly lit |
| Dust | You have a vacuum or collector for each dusty tool, and masks |
| Moisture | Lumber is off the floor; you have a moisture meter or a plan to acclimate wood |
| Fire safety | Rag handling, closed finish storage, extinguisher and alarm are in place |
| Layout | Lane, bench, storage and parking spots are taped on the floor |
| Tools | Your first project’s tools are bought; the big machine can wait |
FAQ
How do I set up a woodworking shop in my garage?
Measure the space, decide whether a car still parks there, sort out power and lighting, plan dust collection, store lumber off the floor away from moisture, set up fire safety, lay out the bench and cutting lane, and buy tools as your projects need them.
Is a one-car garage big enough for a woodshop?
Yes. A 12 x 20 ft garage fits a bench, wall storage, benchtop tools and a jobsite table saw, with enough length to rip an 8-ft board along the long axis when the car is out.
Do I need a dust collector in a garage woodshop?
Not to start. A shop vacuum connected to sanders and saws handles most beginner work. A dust collector or chip separator becomes important if you plane lumber or use a table saw often.
Can I keep lumber in a garage?
Yes, on racks off the floor and away from exterior doors. Garage humidity varies, so let wood acclimate to the conditions where the finished piece will live before final milling.
Does a garage woodshop need special wiring?
It depends on your garage and tools. Many shops need more outlets or circuits; larger machines may need 240 V. Have a licensed electrician assess your garage before adding load.