
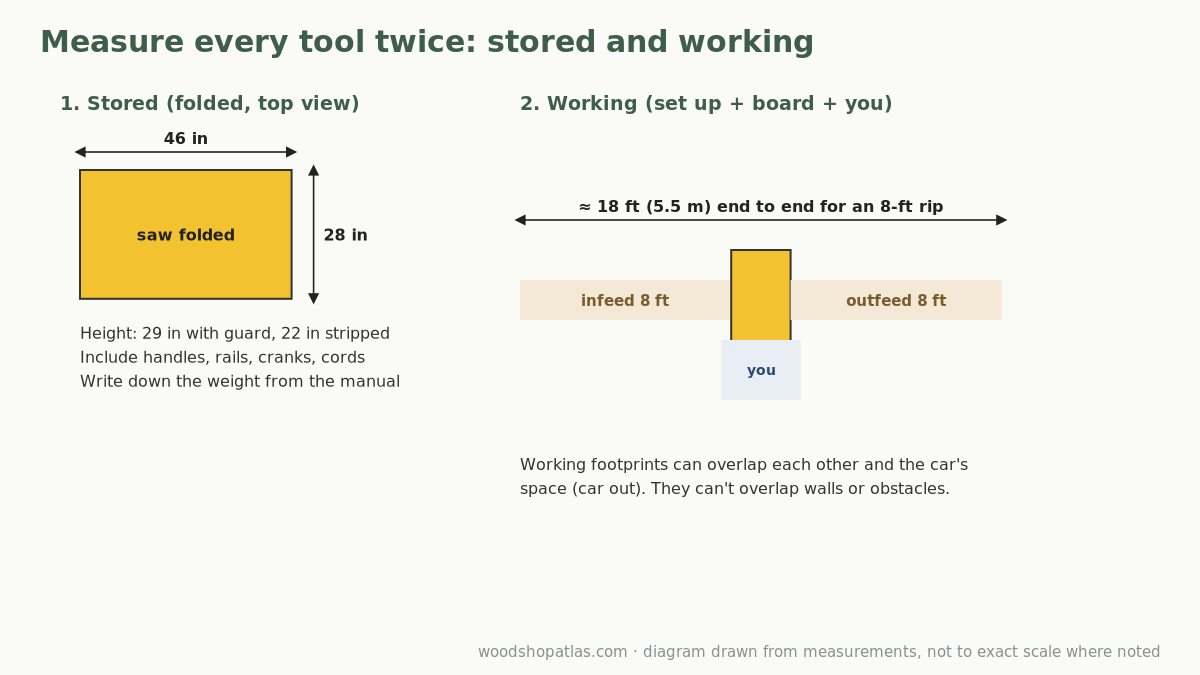
If you’re working out how to measure equipment for workshop storage, the method is simple: measure every tool twice: once in its storage position (folded, rails retracted, handles stowed) and once in its working position (set up, plus the space the workpiece and you need around it). Measure the widest point in each direction, including handles, cranks, fences and cords, and write down the weight. Then measure the space it has to fit in at the height where the tool will sit, not just at floor level. With those numbers, you can check a layout on paper before you move anything heavy.
Spec sheets rarely help as much as you’d hope. They usually list the table size or the box size, not the tool’s real footprint folded or set up. This guide shows how to get the numbers yourself.
What you need
- A 25-ft (7.5 m) tape measure
- A combination or framing square, to sight straight down from the widest point to the floor
- A straightedge or level, laid across handles and cranks to find their outer edge
- Painter’s tape and a marker, to tape footprints on the floor
- A notebook or the worksheet below
- A phone, to photograph each tool with the tape in the frame
Step 1: measure the storage footprint
Put the tool in the exact state it will be stored in: stand folded, fence rails pushed in, extension tables up, crank handle in its stored position, cord wrapped. Then measure:
- Width: side to side at the widest point. Lay a straightedge across protruding handles and measure to it.
- Depth: front to back, the same way.
- Height: floor (or shelf) to the highest point. If it lives on a shelf, measure the tool alone and the shelf gap separately.
- Weight: from the manual or the manufacturer’s spec page. You’ll need it to choose between a shelf, a cart and the floor.
Round up to the next half inch (or centimetre). If a part sticks out at only one height, such as a handle near the top, note that too. It may clear a shelf edge or a parked car’s bumper even though the base doesn’t.
Step 2: measure the working footprint
The working footprint is the tool set up for use plus the material and the operator. That’s the number that decides whether a layout works.
- The tool set up: stand legs extended, extension wings out, outfeed tables down.
- The workpiece: for anything you feed through or along a tool (table saw, planer, router table, miter saw), add the longest piece you’ll cut in front of it and behind it, or to each side. An 8-ft (244 cm) board needs about 8 ft on each side of the cutting point.
- You: about 30–36 in (76–91 cm) to stand and move at the operating position, more if you’ll be pushing long boards.
- The manual’s clearances: many manuals tell you where support is needed. DeWalt’s table saw manual, for example, says to always use a work support for long material or panels, at the same height as the saw table or slightly lower (DeWalt DWE7491 manual). Read the setup section of each manual and add what it asks for.
Write down the working footprint as a rectangle: length along the feed direction x width across it.
Step 3: measure the space
Measure the room the way the tools will use it:
- Clear width and depth at about 36 in (91 cm) high, at the front, middle and back. Walls aren’t always straight, and steps, posts and shelves eat inches.
- Obstructions: steps into the house, the water heater, the electrical panel, the garage door tracks and opener, windows and doors and their swing.
- Ceiling height where tall items will stand, and under the garage door tracks, which are often lower than the ceiling.
- The car, if it shares the space: length bumper to bumper, width mirror to mirror, and the space you need to open the driver’s door and get out. Measure your own car rather than using a brochure number.
Our one-car garage layouts and the guide to fitting a woodshop in a garage that still parks a car show what to do with these numbers.
A worksheet you can copy
| Tool | Stored W x D x H | Weight | Working footprint (L x W) | Feed direction | Needs power? | Lives on |
|---|---|---|---|---|---|---|
| Example: jobsite table saw | 46 x 28 x 29 in | about 90 lb | 16 ft x 6 ft | Front to back | Yes | Own stand |
| Example: benchtop planer | 24 x 22 x 19 in | about 92 lb | 14–19 ft x 3 ft | Front to back | Yes | Cart |
Print this page or copy the table into a spreadsheet. The example rows come from the worked cases below; their weights are retailer figures, so check your own tool’s manual.
Worked example 1: a jobsite table saw
The DeWalt DWE7491RS is a common small-shop saw, which makes it a good example.
- Spec sheet: DeWalt lists a 21-7/8 x 26-3/8 in (56 x 67 cm) table and 32-1/2 in (83 cm) of rip capacity (DeWalt). Neither is the footprint.
- Storage footprint: a DeWalt representative answering a customer question gave the folded size as about 46 in long, 28 in wide and 29 in high with the guard in place, or 22 in high with the guard removed, blade lowered and fence stowed (Lowe’s Q&A). That 7-in difference decides whether it fits under a shelf.
- Working footprint: to rip an 8-ft board you need the board’s length in front of the blade and roughly its length behind, so about 16 ft (4.9 m) along the feed direction plus the saw. Across the feed direction, allow for the fence at full extension, the stand and room to stand.
Full details: DeWalt DWE7491RS dimensions, folded and set up.
Worked example 2: a benchtop planer
A DeWalt DW735X weighs about 92 lb (42 kg) and takes up about 24 x 22 in (61 x 56 cm) with its tables folded, according to retailer listings. In use, a 6-ft board needs about 6 ft in front and 6 ft behind, so a lane of 14–15 ft (4.3–4.6 m). The weight decides storage: a shelf at knee height means lifting 92 lb every session, so a cart at working height is the usual answer. See DeWalt DW735 dimensions and planer stand options.
Turning measurements into a layout
- Tape the storage footprints on the floor where each tool will park. Leave a path to reach each one.
- Overlay the working footprints. Working footprints can overlap each other (you only use one tool at a time) and can overlap the car’s space if the car is out when you work. They can’t overlap walls or fixed obstacles.
- Line up feed directions with the room’s long axis. That’s usually the only direction with 16 ft or more.
- Check heights. Tools that share outfeed support should be at the same height, or the support slightly lower than the table, as DeWalt’s manual says.
- Test it. Park and unpark for a week before you build anything permanent.
Our garage workshop planner lets you drag footprints onto a to-scale plan and switch between parked and working modes, which is quicker than moving tape. The portable vs. stationary tools guide compares both footprints for common tools.
Common measuring mistakes
- Using the table size as the footprint. Fence rails, stands and motors stick out past the table.
- Measuring with the tool set up, then storing it folded (or the other way around). Measure both.
- Forgetting handles and cranks. A planer’s crank or a saw’s height wheel can add inches.
- Measuring the room at floor level only. Bench height is where the steps, the panel and the water heater get in the way.
- Ignoring weight. A tool that fits a high shelf may be too heavy to lift there safely. Plan heavy tools at or near working height.
- Trusting one source. Retailer listings, manuals and spec pages often disagree by an inch or two. Measure your own tool when you can.
FAQ
How do I measure a tool’s footprint?
Put it in the position it will be stored in, then measure width, depth and height at the widest points, including handles, fences and cranks. Measure it again set up for use, and add the space the workpiece and you need around it.
What is the difference between storage footprint and working footprint?
Storage footprint is the space a tool takes when it’s folded and put away. Working footprint is the tool set up, plus the material you feed through it and room for you to stand. The working footprint is usually many times larger.
How much space do I need around a table saw?
To rip an 8-ft board, about 16 ft (4.9 m) along the feed direction plus the saw itself, with support for long boards at or slightly below table height. Crosscutting wide panels also needs room to the side.
Should I measure my garage at floor level?
Measure at about 36 in (91 cm) high too. That’s where benches and tools sit, and where steps, panels and water heaters reduce the usable width.