
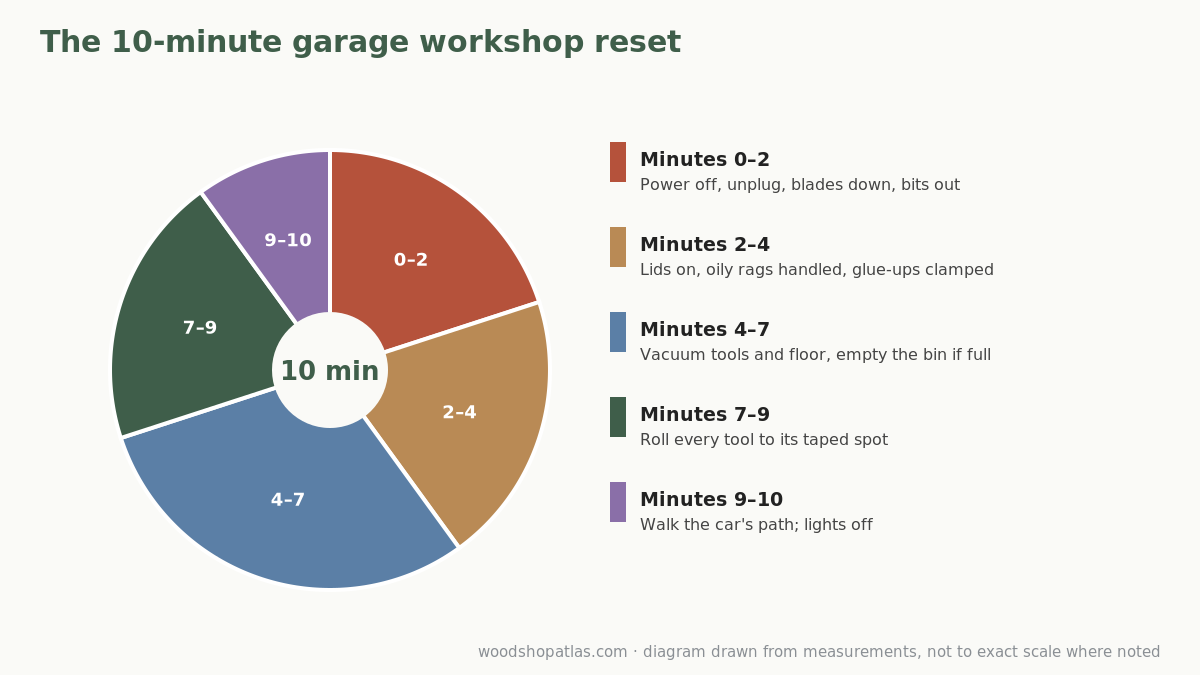
A shared garage needs two layouts: work mode, where tools roll into the middle of the bay, and parking mode, where everything lives against the walls and the car fits. A garage workshop reset routine is how you get from one to the other, and it should take about 10 minutes. It only does if three things are true: every tool has a marked parking spot, nothing you use daily needs lifting, and cleanup happens in a fixed order (power off, blades safe, finishes dealt with, then dust, then rolling things home).
Below is the routine, minute by minute, and the setup that makes it work.
Why a fixed routine beats “tidying up”
In a garage that only holds a workshop, you can leave a glue-up clamped on the bench overnight and the table saw in the middle of the floor. In a shared garage, the car is waiting. Without a routine, three things happen:
- Tools end up parked in the driver’s door zone because that’s the nearest free space.
- Sawdust lands on the car, then gets tracked into the house.
- The reset takes 30–45 minutes, so you start skipping short sessions altogether.
A routine fixes the third problem most of all. If you know cleanup takes 10 minutes, a 45-minute session after dinner is worth doing.
The setup that makes 10 minutes possible
Do this once, and the daily reset gets fast.
1. Tape a parking spot for everything that moves
Mark a rectangle on the floor for each rolling tool, cart and folding stand, sized to its storage footprint. Painter’s tape for a week, then paint or floor tape once you’re sure. Label them. A jobsite saw’s spot, a planer cart’s spot and the rolling bench’s spot shouldn’t overlap and shouldn’t touch the car’s path.
How big? Use each tool’s stored size, not its working size. A folding work table like the WORX Pegasus folds to about 35 x 25 x 5 in (89 x 64 x 13 cm) per WORX; a DeWalt DW7350 planer stand is about 27 x 21 in (69 x 53 cm) per retailers. We show more stored vs. working footprints in portable vs. stationary tools.
2. Mark the car’s zone too
Tape the outline of the car plus the driver’s door zone (30–36 in / 76–91 cm beside the driver’s side) on the floor. Nothing ever parks in it. If you haven’t measured yours yet, how to plan a woodshop in a garage that still parks a car walks through it.
3. Put wheels under anything over about 50 lb
A benchtop planer (the DW735 is about 92 lb / 42 kg) or a jobsite saw on a non-rolling stand turns the reset into a weightlifting session. Carts, mobile stands and locking casters pay for themselves in reset time. See planer stands and flip-top carts.
4. Give hand tools a wall
A French cleat wall or pegboard above the bench means hand tools go back where you can see them. Drawers are tidier but slower; shadow outlines on a wall are the fastest put-away system there is.
5. Keep the cleanup kit in one place
Shop vacuum, brush, dustpan, a lidded metal can for finishing rags, a trash bin and a bin for offcuts, all in one spot near the bench.
The 10-minute reset, step by step
Times are approximate. The order matters more than the minutes.
Minutes 0–2: power and blades
- Switch off and unplug stationary and benchtop tools, or pull batteries from cordless ones.
- Lower table saw blades fully; retract router bits; put blade guards back on.
- Put away loose blades and bits in their cases.
This comes first because everything after involves reaching around tools.
Minutes 2–4: finishes, glue and anything that can’t wait
- Oily rags: if you used an oil-based finish (linseed, tung, oil-based stain or varnish), deal with the rags now. The NFPA explains that these oils release heat as they dry and a pile of rags can trap it and catch fire. Its advice is to hang or spread the rags outside to dry, weighted down and away from buildings, then store them in a metal container with a tight lid filled with water and detergent (NFPA oily rags tip sheet). Water-based finishes don’t carry this risk, per the same sheet.
- Cap glue and finish cans tightly.
- If a glue-up has to stay clamped, move it to a spot that isn’t in the car’s path (on the bench or a shelf), not on a sawhorse in the middle of the floor.
Minutes 4–7: dust
- Vacuum tool tops, the bench and the floor in the work zone, working toward the vacuum’s parking spot.
- Empty the vacuum or chip bin if it’s more than about half full; full vacuums lose suction fast.
- If you sanded, give the dust a few minutes to settle before the car comes in, or run an air filter while you finish the rest.
Sweeping with a broom puts fine dust back into the air. A vacuum is better for anything you’ll breathe or that will land on the car.
Minutes 7–9: roll everything home
- Fold stands, retract fence rails, fold planer tables.
- Roll each tool onto its taped spot and lock the casters.
- Stack offcuts in the offcut bin; anything shorter than you’d ever use goes in the trash or kindling bag.
Minute 9–10: final check
- Walk the car’s taped outline: nothing inside it, nothing in the door zone.
- Cords coiled and off the floor.
- Lights off, door to the house closed.
Then bring the car in.
What to leave set up (and what never to)
Fine to leave set up: the bench vise, wall-hung tools, a project clamped up on the bench, a drill press or sander on a cart in its spot.
Never leave out: anything plugged in and unattended, oily rags in a pile, a blade raised, a folding stand open where a door can hit it, and anything tall and tippy in the door zone.
Printable reset checklist
Copy this onto a card and tape it by the light switch:
- Tools off and unplugged; batteries out.
- Blades down, bits out, guards on.
- Oily rags dried flat outside or sealed in a metal can with water.
- Glue and finish cans closed.
- Vacuum tools, bench, floor.
- Vacuum or chip bin emptied if half full.
- Stands folded, tables up, rails in.
- Every rolling tool on its taped spot, casters locked.
- Nothing in the car outline or door zone.
- Cords up, lights off.
Planning parking spots before you tape
The reset is only as fast as the parking plan behind it. Before you tape the floor, sketch it:
- Measure the garage’s clear width and depth, and the car’s length and width with mirrors.
- Mark the car’s outline and the driver’s door zone. Nothing parks there, ever.
- List every tool that moves and its folded footprint: stand legs, handles and crank arms included.
- Fit them along the walls in the order you’ll use them, so the first tool out is closest to the work area.
- Leave a clear path from each parking spot to the middle of the bay.
Our garage workshop planner lets you do this to scale on screen: drag in the car and your tools, and switch between parked and working modes. For four measured examples, see one-car garage woodshop layouts. Once the plan works on paper, tape it, park against it for a week, and adjust before you commit to wall storage.
Making the reset even faster
- Batch messy work. Plane, rip and sand on the same day, then do the big clean once.
- Cut sheet goods outside or with the car out, on sawhorses with a track saw or guided circular saw. See track saw vs. table saw.
- Choose tools that pack small. A folding bench and a jobsite saw beat a fixed bench and a cabinet saw in a shared garage. See folding vs. rolling vs. fixed workbenches.
If you’re just setting up, our garage woodshop setup guide and Start Here page have the bigger picture.
FAQ
How long should it take to clean up a garage workshop?
With marked parking spots, wheels on heavy tools and a fixed order, about 10 minutes after a typical session. Heavy sanding or planing days take longer because of dust.
What should I do with finishing rags at the end of the day?
For oil-based finishes, follow the NFPA’s advice: hang or spread them outside to dry, then store them in a sealed metal container filled with water and detergent, and check local disposal rules.
Is it OK to leave sawdust in the garage overnight?
Fine dust on surfaces ends up on the car and in the house, and chip piles near heat sources are a fire risk. Vacuum the work zone each session.
How do I keep tools out of the way of the car?
Tape the car’s outline and door zone on the floor and give every tool a taped parking spot outside it. Wheels on anything heavy make sticking to it easy.